Tips and Tricks
 Tips and Tricks
When using the eBook Starter software, there are many tips and tricks you can use to customize the software to your specific needs.
Our developers have literally gone to the extreme to make this software as flexible as possible.
What this means is that you have the ability to control just about every aspect of your eBook's development.
Click each link below to learn the tips and tricks you desire:
- Toolbar Scripts
- Customizing the Editor's eBook Links
- Printing
- Adding Forms to Your eBook
- Adding Audio to Your eBook
- Adding Video to Your eBook
![]() Toolbar Scripts
Toolbar Scripts
If you're using your own files to create an ebook, you can create special links within your pages that function just like the eBook toolbar buttons.:
First Page
Link:
| <a href="javascript:window.external.story.first();">First page</a> |
Image:
| <a href="javascript:window.external.story.first();"><img src="\first_pg_ic.gif" BORDER="0" ALIGN="Top"></a> |
Last Page
Link:
| <a href="javascript:window.external.story.last();">Last page</a> |
Image:
| <a href="javascript:window.external.story.last();"><IMG SRC="\last_pg_ic.gif" BORDER="0" ALIGN="Top"></a> |
Next Page
Link:
| <a href="javascript:window.external.story.next();">Next page</a> |
Image:
| <a href="javascript:window.external.story.next();"><IMG SRC="\next_pg_ic.gif" BORDER="0" ALIGN="Top"></a> |
Previous Page
Link:
| <a href="javascript:window.external.story.prior();">Previous page</a> |
Image:
| <a href="javascript:window.external.story.prior();"><IMG SRC="\prior_pg_ic.gif" BORDER="0" ALIGN="Top"></a> |
Back
Link:
| <a href="javascript:window.history.back();">Go back</a> |
Image:
| <a href="javascript:window.history.back();"><IMG SRC="\back_ic.gif" BORDER="0" ALIGN="Top"></a> |
Forward
Link:
| <a href="javascript:window.history.forward();">Go forward</a> |
Image:
| <a href="javascript:window.history.forward();"><IMG SRC="\forward_ic.gif" BORDER="0" ALIGN="Top"></a> |
Next Chapter
Link:
| <a href="javascript:window.external.story.NextChapter(1);">Go to next chapter</a> |
Image:
| <a href="javascript:window.external.story.NextChapter(1);"><IMG SRC="\next_ch_ic.gif" BORDER="0" ALIGN="Top"></a> |
Previous Chapter
Link:
| <a href="javascript:window.external.story.PriorChapter(1);">Go to prior chapter</a> |
Image:
| <a href="javascript:window.external.story.PriorChapter(1);"><IMG SRC="\prior_ch_ic.gif" BORDER="0" ALIGN="Top"></a> |
Print
Link:
| <a href="javascript:window.external.WebBrowser.ExecWB(7,2);">Print</a> |
Image:
| <a href="javascript:window.external.WebBrowser.ExecWB(7,2);"><IMG SRC="\print_ic.gif" BORDER="0" ALIGN="Top"></a> |
Copy
Link:
| <a href="javascript:window.external.WebBrowser.ExecWB(12,2);">Copy</a> |
Image:
| <a href="javascript:window.external.WebBrowser.ExecWB(12,2);"><IMG SRC="\copy_ic.gif" BORDER="0" ALIGN="Top"></a> |
Browser Home
Link:
| <a href="javascript:window.external.WebBrowser.GoHome();">Home</a> |
Image:
| <a href="javascript:window.external.WebBrowser.GoHome();"><IMG SRC="\home_ic.gif" BORDER="0" ALIGN="Top"></a> |
eBook Home
Link:
| <a href="javascript:window.external.story.first();">First page</a> |
Image:
| <a href="javascript:window.external.story.first();"><img src="\home_ic.gif" BORDER="0" ALIGN="Top"></a> |
Refresh
Link:
| <a href="javascript:window.external.WebBrowser.ExecWB(22,2);">Refresh</a> |
Image:
| <a href="javascript:window.external.WebBrowser.ExecWB(22,2);"><IMG SRC="\refresh_ic.gif" BORDER="0" ALIGN="Top"></a> |
About
Link:
| <a href="javascript:window.external.ShowUserForm('about');">About</a> |
Image:
| <a href="javascript:window.external.ShowUserForm('about');"><IMG SRC="\about_ic.gif" BORDER="0" ALIGN="Top"></a> |
Exit
Link:
| <a href="javascript:window.external.terminate();">Exit</a> |
Image:
| <a href="javascript:window.external.terminate();"><IMG SRC="\exit_ic.gif" BORDER="0" ALIGN="Top"></a> |
![]() Customizing the Editor's eBook Links
Customizing the Editor's eBook Links
You can place image links within your eBook that function just like your eBook's toolbar.
Within the eBook Editor, click on the ![]() button and then on the link you'd like to place within your eBook.
button and then on the link you'd like to place within your eBook.
Replacing Your Image Links with Text Links
If you'd rather not use images for your eBook links that display within the drop-down list, you can use text links instead. Go to:
| C:\Program Files\eBook Starter\Special |
Simply replace the code within each text file with the special link codes displayed within the 'Toolbar Scripts' section above.
Replacing the Default Images with Your Own
If you'd like to use different images for your links, go to:
| C:\Program Files\eBook Starter\DefaultProject\DefaultProject.files |
Simply replace the existing images with your own. Make sure you either use the same names for your images or use different names and change the names within the text files located here:
| C:\Program Files\eBook Starter\Special |
Adding Additional Functions to Your eBook Link Menu
If you'd like to add additional functions to the eBook link drop-down list, create your text files like the other files within the 'Special' folder and add it to the 'Special.xml' file located here:
| C:\Program Files\eBook Starter\Special\Special.xml |
If you're including images, place them within the default project folder here:
| C:\Program Files\eBook Starter\DefaultProject\DefaultProject.files |
Default eBook Link Images
| Image | Caption | Action |
|---|---|---|
| First Page | Go to the first page of the eBook | |
| Last Page | Go to the last page of the eBook | |
| Next Page | Go to the next page of the eBook | |
| Previous Page | Go to the previous page of the eBook | |
| Go Back | Go back in the browser's history | |
| Go Forward | Go forward in the browser's history | |
| Next Chapter | Go to the Next Chapter | |
| Previous Chapter | Go to the Previous Chapter | |
| Print a page (For use within your own files only. Not for template use.) | ||
| Copy | Copy text to the clipboard | |
| Browser Home | Go to the browser's home page | |
| Ebook Home | Go to the eBook's home page | |
| Refresh | Refresh a page | |
| About | Display the eBook's 'About' window | |
| Exit | Exit the eBook |
![]() Printing
Printing
If you've ever tried to print a web page, you know how difficult it can be. The text may be cut off, the graphics may not display properly and you waste a lot of ink printing unnecessary content.
As HTML eBooks are simply HTML web pages, most do not print properly. For this reason, the eBook Starter print function was specifically designed to alleviate this problem.
eBook Starter will enable your readers to click on a 'Print Button Drop-Down List' and select the content within your eBook they'd like to print. What's more, they can even preview the content by clicking on a 'Print Preview' button.
This feature is exclusive to eBook Starter. If you'd like to enable your readers to print your eBooks, and you're using one of the templates, simply visit the 'Customizing Your eBook's Toolbar Buttons' section and add the 'Print' button to your eBook's toolbar.
If you're creating your own templates, visit the 'Creating Your Own Templates' section for detailed instructions for adding this print function to your templates.
![]() Adding Forms to Your eBook
Adding Forms to Your eBook
You can include forms within your ebook in one of two ways -- by creating a new HTML page that will include your form or by hand editing the template pages. However, your form processing script MUST reside on your own web server and then be linked to within your form code.
Your form might look something like this:
Creating a New HTML Page for Your Project
![]() Close your eBook Starter software.
Close your eBook Starter software.
![]() Create an HTML page that will be used to display your form.
Create an HTML page that will be used to display your form.
Creating an HTML Page
To create an HTML page, simply open a plain text editor, such as Notepad, and paste the following text:
| <HTML> <HEAD> <TITLE>Your Page Title</TITLE> </HEAD> <BODY> <FORM method='POST' action='http://www.yoursite.com/form.pl'> <TABLE BORDER="0" CELLPADDING="0" ALIGN="Center"> <TR> <TD align="right"><FONT face="Arial,Verdana" SIZE="2">First Name:</FONT></TD> <TD><INPUT type='text' name='first_name' size='12'></TD> </TR> <TR> <TD align="right"><FONT face="Arial,Verdana" SIZE="2">Last Name:</FONT></TD> <TD><INPUT type='text' name='last_name' size='12'></TD> </TR> <TR> <TD align="right"><FONT face="Arial,Verdana" SIZE="2">Email:</FONT></TD> <TD><INPUT type='text' name='email' size='12'></TD> </TR> <TR> <TD COLSPAN=2><P ALIGN=Center><INPUT type='submit' value='Submit'></TD> </TR> </TABLE> </FORM> </BODY> </HTML> |
Edit the form code and text in red to suit your needs. The FORM action URL should lead to your form processing script on your web server. If you're not sure, contact your server administrator for assistance.
Save this file as form.htm within the folder you selected to save your ebook.
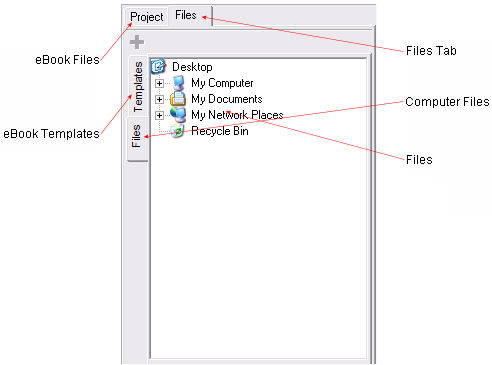
![]() Add your new page to your eBook project (Story Tree) like this: Click on the top 'Files' tab and then on the side 'Files' tab within the files window of eBook Starter to locate your new page.
Add your new page to your eBook project (Story Tree) like this: Click on the top 'Files' tab and then on the side 'Files' tab within the files window of eBook Starter to locate your new page.
Next, click through the folders to locate the page you'd like to add. Once you locate the file, click on it once to highlight and then on the '![]() ' button on the toolbar. Your new page will be added to your project.
' button on the toolbar. Your new page will be added to your project.
Adding a Form to a Template Page
If you are a more advanced user and are familiar with your computer and HTML, you can place a form within a template page.
![]() Close your eBook Starter software. This is very important, as if you don't, you may lose your entire project.
Close your eBook Starter software. This is very important, as if you don't, you may lose your entire project.
![]() Locate your project file, which will be found wherever you saved your eBook. Your project file will look like this:
Locate your project file, which will be found wherever you saved your eBook. Your project file will look like this:
![]()
The 'template.files' name will actually be the name of your eBook. So, for example, if your eBook's file name is dog_grooming, your project file would be named, dog_grooming.files.
![]() Open your project file and locate the page in which you'd like to place the form. Open this page within a plain text editor, such as Notepad, and place your form code within the template HTML between the <PAGE Name="Left Page"> and </PAGE> tags. The Name value "Left Page" will be different according to the template and/or which side of the template you'd like the form to appear. Your form code might look something like this:
Open your project file and locate the page in which you'd like to place the form. Open this page within a plain text editor, such as Notepad, and place your form code within the template HTML between the <PAGE Name="Left Page"> and </PAGE> tags. The Name value "Left Page" will be different according to the template and/or which side of the template you'd like the form to appear. Your form code might look something like this:
| <PAGE Name="Left Page"> <FORM method='POST' action='http://www.yoursite.com/form.pl'> <TABLE BORDER="0" CELLPADDING="0" ALIGN="Center"> <TR> <TD align="right"><FONT face="Arial,Verdana" SIZE="2">First Name:</FONT></TD> <TD><INPUT type='text' name='first_name' size='12'></TD> </TR> <TR> <TD align="right"><FONT face="Arial,Verdana" SIZE="2">Last Name:</FONT></TD> <TD><INPUT type='text' name='last_name' size='12'></TD> </TR> <TR> <TD align="right"><FONT face="Arial,Verdana" SIZE="2">Email:</FONT></TD> <TD><INPUT type='text' name='email' size='12'></TD> </TR> <TR> <TD COLSPAN=2><P ALIGN=Center><INPUT type='submit' value='Submit'></TD> </TR> </TABLE> </FORM> </PAGE> |
Edit the form code and text in red to suit your needs. The FORM action URL should lead to your form processing script on your web server. If you're not sure, contact your server administrator for assistance.
When you've finished editing the file, save it.
![]() Adding Audio to Your eBook
Adding Audio to Your eBook
Audio can be used within your eBook to enable background sounds to play upon page entry. However, as many Internet users find background sounds annoying, make sure the benefits outweigh the risks. In addition, audio files can be very large and will add additional load time to your eBook.
Make sure you use this option wisely.
Creating a New HTML Page for Your Project
![]() Close your eBook Starter software.
Close your eBook Starter software.
![]() Create an HTML page that will be used to play your sound on page entrance. Place the following code within your HTML below your <BODY> tag:
Create an HTML page that will be used to play your sound on page entrance. Place the following code within your HTML below your <BODY> tag:
| <BGSOUND src="yourfile.mid"> |
Edit the text indicated in red to the name of your audio file. If it resides on your web server, you will need to include the complete URL beginning with http://.
Creating an HTML Page
To create an HTML page, simply open a plain text editor, such as Notepad, and paste the following text:
| <HTML> <HEAD> <TITLE>Your Page Title</TITLE> </HEAD> <BODY> <BGSOUND src="yourfile.mid"> </BODY> </HTML> |
Edit the text indicated in red to suit your needs.
Save this file as audio.htm within the folder you selected to save your ebook.
![]() Place your audio file within your project file, which will be found wherever you saved your eBook. Your project file will look like this:
Place your audio file within your project file, which will be found wherever you saved your eBook. Your project file will look like this:
![]()
The 'template.files' name will actually be the name of your eBook. So, for example, if your eBook's file name is dog_grooming, your project file would be named, dog_grooming.files.
![]() Add your new page to your eBook project (Story Tree) like this: Click on the top 'Files' tab and then on the side 'Files' tab within the files window of eBook Starter to locate your new page.
Add your new page to your eBook project (Story Tree) like this: Click on the top 'Files' tab and then on the side 'Files' tab within the files window of eBook Starter to locate your new page.
Next, click through the folders to locate the page you'd like to add. Once you locate the file, click on it once to highlight and then on the '![]() ' button on the toolbar. Your new page will be added to your project.
' button on the toolbar. Your new page will be added to your project.
Adding Audio to a Template Page
If you are a more advanced user and are familiar with your computer and HTML, you can place your audio code within a template page.
![]() Close your eBook Starter software. This is very important, as if you don't, you may lose your entire project.
Close your eBook Starter software. This is very important, as if you don't, you may lose your entire project.
![]() Locate your project file and place your audio file within this folder. You will find your project file wherever you saved your eBook. Your project file will look something like this:
Locate your project file and place your audio file within this folder. You will find your project file wherever you saved your eBook. Your project file will look something like this:
![]()
The 'template.files' name will actually be the name of your eBook. So, for example, if your eBook's file name is dog_grooming, your project file would be named, dog_grooming.files.
![]() Open your project file and locate the page in which you'd like to place the audio. Open this page within a plain text editor, such as Notepad (Go to Start - All Programs - Accessories on your computer desktop), and place your audio code within the template HTML below the <BODY> tag:
Open your project file and locate the page in which you'd like to place the audio. Open this page within a plain text editor, such as Notepad (Go to Start - All Programs - Accessories on your computer desktop), and place your audio code within the template HTML below the <BODY> tag:
| <BGSOUND src="yourfile.mid"> |
Edit the text indicated in red to the name of your audio file and save. If it resides on your web server, you will need to include the complete URL beginning with http://.
![]() Open your project within the eBook Starter software and then re-compile.
Open your project within the eBook Starter software and then re-compile.
Commonly Used Audio Formats
MIDI (.mid) Musical Instrument Digital Interface - Not a recorded audio format. High quality digital sound used for music. File sizes are very small in comparison to the standard audio files.
WAV (.wav) Audio file format used for Microsoft Windows. Files may be compressed or uncompressed. However, even when compressed, produces a very large file size. Used for short voice recordings.
![]() Adding Video to Your eBook
Adding Video to Your eBook
Video files can be used within your eBook to enable videos to play upon page entry. However, keep in mind, video files can be very large and will add additional load time to your eBook. Make sure you use this option wisely.
Creating a New HTML Page for Your Project
![]() Close your eBook Starter software. This is very important, as if you don't, you may lose your entire project.
Close your eBook Starter software. This is very important, as if you don't, you may lose your entire project.
![]() Create an HTML page that will be used to play your video on page entrance. Place the following code within your HTML where you would like the video to appear:
Create an HTML page that will be used to play your video on page entrance. Place the following code within your HTML where you would like the video to appear:
| <IMG dynsrc=yourfile.mpg> |
Edit the text indicated in red to the name of your video file. If it resides on your web server, you will need to include the complete URL beginning with http://.
Creating an HTML Page
To create an HTML page, simply open a plain text editor, such as Notepad, and paste the following text:
| <HTML> <HEAD> <TITLE>Your Page Title</TITLE> </HEAD> <BODY> <IMG dynsrc=yourfile.mpg> </BODY> </HTML> |
Edit the text indicated in red to suit your needs.
Save this file as video.htm within the folder you selected to save your ebook.
![]() Place your video file within your project file, which will be found wherever you saved your eBook. Your project file will look like this:
Place your video file within your project file, which will be found wherever you saved your eBook. Your project file will look like this:
![]()
The 'template.files' name will actually be the name of your eBook. So, for example, if your eBook's file name is dog_grooming, your project file would be named, dog_grooming.files.
![]() Add your new page to your eBook project (Story Tree) like this: Click on the top 'Files' tab and then on the side 'Files' tab within the files window of eBook Starter to locate your new page.
Add your new page to your eBook project (Story Tree) like this: Click on the top 'Files' tab and then on the side 'Files' tab within the files window of eBook Starter to locate your new page.
Next, click through the folders to locate the page you'd like to add. Once you locate the file, click on it once to highlight and then on the '![]() ' button on the toolbar. Your new page will be added to your project.
' button on the toolbar. Your new page will be added to your project.
Adding Video to a Template Page
If you are a more advanced user and are familiar with your computer and HTML, you can place your video code within a template page.
![]() Close your eBook Starter software. This is very important, as if you don't, you may lose your entire project.
Close your eBook Starter software. This is very important, as if you don't, you may lose your entire project.
![]() Locate your project file and place your video file within this folder. You will find your project file wherever you saved your eBook. Your project file will look something like this:
Locate your project file and place your video file within this folder. You will find your project file wherever you saved your eBook. Your project file will look something like this:
![]()
The 'template.files' name will actually be the name of your eBook. So, for example, if your eBook's file name is dog_grooming, your project file would be named, dog_grooming.files.
![]() Open your project file and locate the page in which you'd like to place the video. Open this page within a plain text editor, such as Notepad (Go to Start - All Programs - Accessories on your computer desktop), and place your video code within the template HTML between the <PAGE Name="Left Page"> and </PAGE> tags. The Name value "Left Page" will be different according to the template and/or which side of the template you'd like the video to appear.
Open your project file and locate the page in which you'd like to place the video. Open this page within a plain text editor, such as Notepad (Go to Start - All Programs - Accessories on your computer desktop), and place your video code within the template HTML between the <PAGE Name="Left Page"> and </PAGE> tags. The Name value "Left Page" will be different according to the template and/or which side of the template you'd like the video to appear.
Your code might look something like this:
| <PAGE Name="Left Page"> <IMG dynsrc=yourfile.mpg> </PAGE> |
Edit the text indicated in red to the name of your video file and save. If it resides on your web server, you will need to include the complete URL beginning with http://.
![]() Open your project within the eBook Starter software and then re-compile.
Open your project within the eBook Starter software and then re-compile.
Commonly Used Video Formats
AVI (Windows) Audio Video Interleave - Defined by Microsoft, AVI is the most common audio/video file format for the PC.
WMV - Windows Media Player visual/audio file.
MPG / MPEG Motion Picture Experts Group - An organization that sets the digital format standards for audio and video files. MPEG audio and video are the standard formats used for Video CDs and DVDs.