Tips and Tricks 2
 Tips and Tricks 2
When using the eBook Starter software, there are many tips and tricks you can use to customize the software to your specific needs.
Our developers have literally gone to the extreme to make this software as flexible as possible.
What this means is that you have the ability to control just about every aspect of your eBook's development.
Click each link below to learn the tips and tricks you desire:
- Using JavaScript within Your eBook
- Editing Page Header Images
- Removing Page Header Images
- Editing Your Navigational Tabs
- Distributing Your eBook on CDrom
- Editing Your eBook Style Sheets
- Table of Contents Macro
- Re-registering eBook Starter
![]() Using JavaScript within Your eBook
Using JavaScript within Your eBook
You can use JavaScript within your ebook in one of two ways -- by creating a new HTML page that will include the JavaScript or by hand editing the template pages.
Creating a New HTML Page for Your Project
![]() Close your eBook Starter software.
Close your eBook Starter software.
![]() Create an HTML page that will be used to include your JavaScript code. Place the code within your HTML where your JavaScript code instructions specify -- between the <HEAD> tags and/or within the <BODY> of your document.
Create an HTML page that will be used to include your JavaScript code. Place the code within your HTML where your JavaScript code instructions specify -- between the <HEAD> tags and/or within the <BODY> of your document.
Coding an HTML Page
To create an HTML page, simply open a plain text editor, such as Notepad, and paste the following text:
| <HTML> <HEAD> <TITLE>Your Page Title</TITLE> </HEAD> <BODY> </BODY> </HTML> |
Place your JavaScript code within your HTML where your JavaScript code instructions specify.
Save this file as javascript.htm within the folder you selected to save your ebook.
![]() Add your new page to your eBook project (Story Tree) like this: Click on the top 'Files' tab and then on the side 'Files' tab within the files window of eBook Starter to locate your new page.
Add your new page to your eBook project (Story Tree) like this: Click on the top 'Files' tab and then on the side 'Files' tab within the files window of eBook Starter to locate your new page.
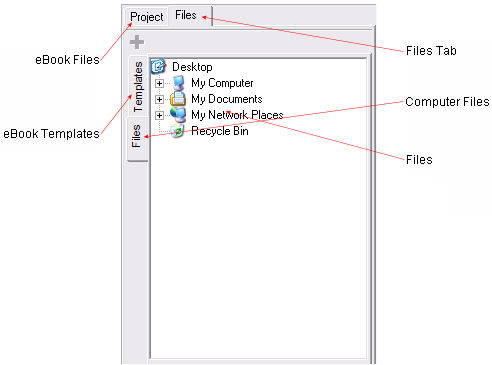
Next, click through the folders to locate the page you'd like to add. Once you locate the file, click on it once to highlight and then on the '![]() ' button on the toolbar. Your new page will be added to your project.
' button on the toolbar. Your new page will be added to your project.
Adding JavaScript to a Template Page
If you are a more advanced user and are familiar with your computer and HTML, you can place your JavaScript code within a template page.
![]() Close your eBook Starter software. This is very important, as if you don't, you may lose your entire project.
Close your eBook Starter software. This is very important, as if you don't, you may lose your entire project.
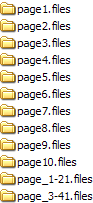
![]() Locate your project file, which will be found wherever you saved your eBook. Your project file will look like this:
Locate your project file, which will be found wherever you saved your eBook. Your project file will look like this:
![]()
The 'template.files' name will actually be the name of your eBook. So, for example, if your eBook's file name is dog_grooming, your project file would be named, dog_grooming.files.
![]() Open your project file and locate the page in which you'd like to place the JavaScript. Open this page within a plain text editor, such as Notepad, and place your JavaScript code within the template HTML where your JavaScript code instructions specify. However, if you will be using code that should be placed between the <BODY> tags, please ensure that you place it between the <PAGE Name="Left Page"> and </PAGE> tags. The Name value "Left Page" will be different according to the template and/or which side of the template you'd like the video to appear. Your code might look something like this:
Open your project file and locate the page in which you'd like to place the JavaScript. Open this page within a plain text editor, such as Notepad, and place your JavaScript code within the template HTML where your JavaScript code instructions specify. However, if you will be using code that should be placed between the <BODY> tags, please ensure that you place it between the <PAGE Name="Left Page"> and </PAGE> tags. The Name value "Left Page" will be different according to the template and/or which side of the template you'd like the video to appear. Your code might look something like this:
| <PAGE Name="Left Page"> <JavaScript> </PAGE> |
Change the text indicated in red to your actual JavaScript code and save.
![]() Open your project within the eBook Starter software and then re-compile.
Open your project within the eBook Starter software and then re-compile.
![]() Editing the Page Header Images
Editing the Page Header Images
If you're using one of the templates that includes page header graphics, here's how you can edit them.
![]() Always make sure you close the eBook Starter software anytime you are working with the raw project files, which are the files created by the software, such as your .files, .system, and .ebp files. This is very important, as if you don't, you could lose all of your files.
Always make sure you close the eBook Starter software anytime you are working with the raw project files, which are the files created by the software, such as your .files, .system, and .ebp files. This is very important, as if you don't, you could lose all of your files.
![]() To edit the image, your first step will be to open your project folder. The folder will be located wherever you saved your ebook project.
To edit the image, your first step will be to open your project folder. The folder will be located wherever you saved your ebook project.
![]() When you create an ebook, the system creates a folder that contains your ebook's files (template, text, images, etc.), a folder that contains your ebook's system files (toolbar buttons, logo, variables, etc.), your ebook's project file and your actual ebook file.
When you create an ebook, the system creates a folder that contains your ebook's files (template, text, images, etc.), a folder that contains your ebook's system files (toolbar buttons, logo, variables, etc.), your ebook's project file and your actual ebook file.
If you called your ebook dog_grooming, here's what these folders and files will be called:
dog_grooming.files (template, text, images, etc.)
dog_grooming.system (toolbar buttons, logo, variables, etc.)
dog_grooming.ebp (ebook settings)
dog_grooming.exe (your ebook)
To locate the image, open the dog_grooming.files folder of the page you'd like to edit. You can then locate the image, open it within a graphics editor to make changes, and then save it. As long as the image is the same size, you won't need to edit the HTML page.
![]() Removing the Page Header Images
Removing the Page Header Images
If you're using one of the templates that includes page header graphics, here's how you can remove them.
![]() Always make sure you close the eBook Starter software anytime you are working with the raw project files, which are the files created by the software, such as your .files, .system, and .ebp files. This is very important, as if you don't, you could lose all of your files.
Always make sure you close the eBook Starter software anytime you are working with the raw project files, which are the files created by the software, such as your .files, .system, and .ebp files. This is very important, as if you don't, you could lose all of your files.
![]() To remove the image, your first step will be to open your project folder. This folder will be located wherever you saved your ebook project.
To remove the image, your first step will be to open your project folder. This folder will be located wherever you saved your ebook project.
![]() When you create an ebook, the system creates a folder that contains your ebook's files (template, text, images, etc.), a folder that contains your ebook's system files (toolbar buttons, logo, variables, etc.), your ebook's project file and your actual ebook file.
When you create an ebook, the system creates a folder that contains your ebook's files (template, text, images, etc.), a folder that contains your ebook's system files (toolbar buttons, logo, variables, etc.), your ebook's project file and your actual ebook file.
If you called your ebook dog_grooming, here's what these folders and files will be called:
dog_grooming.files (template, text, images, etc.)
dog_grooming.system (toolbar buttons, logo, variables, etc.)
dog_grooming.ebp (ebook settings)
dog_grooming.exe (your ebook)
![]() Open the dog_grooming.files folder to locate the template pages.
Open the dog_grooming.files folder to locate the template pages.
![]() Open page_1-2.htm within a plain text editor, such as Notepad (Can be found on your computer within 'Accessories'), and remove the following:
Open page_1-2.htm within a plain text editor, such as Notepad (Can be found on your computer within 'Accessories'), and remove the following:
| <P ALIGN=Center> <IMG WIDTH="206" HEIGHT="49" BORDER="0" SRC="${NAME}.files/intro.gif"> <P ALIGN=Left> <P ALIGN=Center> <IMG WIDTH="159" HEIGHT="49" BORDER="0" SRC="${NAME}.files/foreword.gif"> <P ALIGN=Left> |
![]() Open page_3-4.htm and REPLACE the following:
Open page_3-4.htm and REPLACE the following:
| <IMG WIDTH="144" HEIGHT="49" BORDER="0" SRC="${NAME}.files/contents.gif"> |
Replace the above HTML code with this:
| <font face="Georgia" size="+1">Your Text</font> |
Edit the font face and text to suit your needs.
Remove this code:
| <P ALIGN=Center> <IMG WIDTH="144" HEIGHT="49" BORDER="0" SRC="${NAME}.files/about.gif"> <P ALIGN=Left> |
Once you're finished with all of the changes, save your files. You can then edit the Introduction, Foreword and About pages within the software.
![]() Editing Your Navigational Tabs
Editing Your Navigational Tabs
You can change your ebook's navigational tabs.
Your first step will be to locate the navigational tab images you would like to edit. You can find them within your ebook's page folders. For example, if you created your ebook's project folder within your 'My Documents' folder, you can find your ebook's page folders here:
| C:\Documents and Settings\YourScreenName\My Documents\YourEbookProject\projectname.files\page1.files |
The 'YourScreenName' text, indicated in red, will actually be your computer screen name.
The 'YourEbookProject' text, indicated in red, will actually be the name of the folder you created for your ebook project.
The 'projectname' text, indicated in red, will actually be the name in which you saved your ebook project.
If you are using a template that includes an Introduction, Foreword, Contents and About pages, and your ebook contains 10 pages, your ebook's page folders and files will look something like this:

You will need to save a copy of the updated image to each page folder you may have, as each page has its own files.
All of the ebook template images were created with Paint Shop Pro. In order to edit the images, you'll need to get a copy of Paint Shop Pro or another graphics program capable of editing GIF images.
| Note: The instructions below were written for Paint Shop Pro X. If you are using a different version of Paint Shop Pro or another graphics program, the graphic tools mentioned below will not be located in the same places. Before you begin, make sure you make a copy of the image you want to edit. That way you will have a backup copy, if needed. |
Editing Your Tabs
When editing the tabs image, make sure that you save your image with the same name (right.gif) and within the original folder. In addition, make sure you don't make any other changes to the tabs, such as changing their sizes or the size of the image, as your navigational image map will not function properly.
Your first step will be to open your right.gif image and increase the image's colors. In Paint Shop Pro, go to 'Image' - 'Increase Color Depth' - 'RGB –16 bits/channel.'
Rotating Your Image
Next, you'll need to rotate your image. Go to 'Image'- 'Rotate Left.'
| Note: If you'd ever like to get a close up view of your image, click on the image to select it and roll the wheel of your mouse up to zoom in and down to zoom out. |
Editing Your Tab Colors
Your next step will be to either completely change the tab colors or remove the existing words.
![]() Your first step will be to click on the 'push brush' tool on the left hand side of your screen.
Your first step will be to click on the 'push brush' tool on the left hand side of your screen.
Next, on the toolbar at the top, within the 'shape' section, select the 'round' brush. The 'size' should be set to '6.' The 'hardness' should be set to '0.' The 'Step' should be set to '10.' The 'Density' – 'Thickness' and 'Opacity' should be set to '100' and the 'Rotation' should be set to '0.'
Next, place the push brush over your tab color (not the text), click and hold your left mouse button and push your tab colors over the existing text. Repeat this step until all of the text has been removed within each tab.
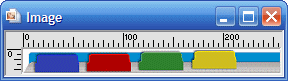
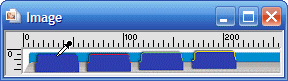
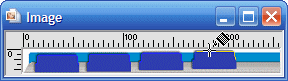
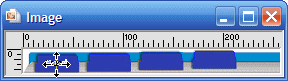
Here's how your image might look:
| Note: To undo your last change, go to 'Edit' - 'Undo' and it will only undo the last thing you did. |
Changing Your Tab Colors
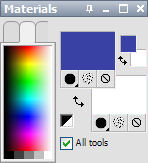 If you would like to change the colors of your tabs, your first step will be to select your perferred color within the 'Materials' window. The Materials window is located on the right hand side of your screen. To change the color, click in the center of the top box, select your preferred color and click on 'OK.'
![]() Your next step will be to fill your tabs with your new selected color. Click on the tipping paint can to select it.
Your next step will be to fill your tabs with your new selected color. Click on the tipping paint can to select it.
Next, on the toolbar at the top, the 'Match mode' should be set to 'RGB value,' the 'Tolerance' should be set to '10,' the 'Blend mode' should be set to 'Normal,' and the 'Opacity' should be set to '100.'
You're now ready to fill your tabs. Place your mouse pointer over your tab, left click to fill your image with the foreground color or right click to fill your image with the background color.

Notice that the trim color of the tab remains the same. To change this color, you'll need to use the dropper tool.
![]() Click on the dropper tool on the left hand side of your screen. This tool is used to pick up colors that are already within your image.
Click on the dropper tool on the left hand side of your screen. This tool is used to pick up colors that are already within your image.
Next, place the dropper over the color you would like to pick up and left click on your mouse.
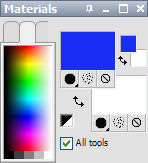
The new color will now be displayed within the top color box of the Materials window.
![]() Your next step will be to fill in the tab trim with the new color. Click on the floodfill tool on the left hand side of your screen.
Your next step will be to fill in the tab trim with the new color. Click on the floodfill tool on the left hand side of your screen.
Place the floodfill tool over the trim and left click on your mouse to fill.
Adding Text
Your first step will be to select your text color. The 'Materials' window is located on the right hand side of your screen. To change the text color, click in the center of the bottom box, select your preferred color and click on 'OK.' The bottom box will be the color in which your text will be displayed.
![]() Once you've selected your text color, click on the text tool on the left hand side of your screen. Place your cursor over your tab and click on your left mouse button. This will launch your text entry window. Select your font and text size from the drop down menu at the top of the screen and type in your text. For this example, I will be using 'Arial' - 'Bold' - 'Italics' size '7.' Within the 'Antialias' section, select 'Sharp' and within the 'Create as' section, select 'Floating' and then click 'OK.'
Once you've selected your text color, click on the text tool on the left hand side of your screen. Place your cursor over your tab and click on your left mouse button. This will launch your text entry window. Select your font and text size from the drop down menu at the top of the screen and type in your text. For this example, I will be using 'Arial' - 'Bold' - 'Italics' size '7.' Within the 'Antialias' section, select 'Sharp' and within the 'Create as' section, select 'Floating' and then click 'OK.'
Keep in mind, you'll want to select your font size based on the length of your longest word. If your longest word fits, then you can be certain the rest of your text will fit on your tabs as well.
| Note: Antialias will smooth out all of the rough edges of your text and blend it in with your background color. You will use the Antialias setting with various graphic tools when designing your graphics, so it is important to remember its function. |
You will now see your text with, what looks like, marching ants around it. If you'd like to move your text, click and hold your left mouse button to drag it to your desired position. When you're satisfied with the position, right click on your mouse and go to 'Select None' to set it.
| Note: To undo your last change, go to 'Edit' - 'Undo' and it will only undo the last thing you did. |
Rotating Your Image
Once you have added all of your text, you will need to rotate your image. Go to 'Image'- 'Rotate Right.'
Saving Your Image
Your final step will be to save your new right.gif image. Go to 'File' - 'Save.' Or, if you don't want to save it within the same directory, go to 'File' - 'Save As' and select a directory. Type in right.gif for your file name and click on 'OK.'
![]() Distributing Your eBook on CDrom
Distributing Your eBook on CDrom
You can place your eBook on a CDrom and enable it to auto start when placed within a CDrom drive:
![]() Once you've created your eBook, open your text editor, such as Notepad, which should be installed on your computer within accessories. To locate it, go to 'Start' - 'All Programs' - 'Accessories' and click on Notepad to open it.) and type in the following information:
Once you've created your eBook, open your text editor, such as Notepad, which should be installed on your computer within accessories. To locate it, go to 'Start' - 'All Programs' - 'Accessories' and click on Notepad to open it.) and type in the following information:
[autorun]
open=ebook.exe (Change the 'ebook.exe' text to the name of your eBook file.)
For example, if your ebook's file name is doggrooming, your text would look like this:
[autorun]
open=doggrooming.exe
| Note: When you create an ebook, the system creates a folder that contains your ebook's files (template, text, images, etc.), a folder that contains your ebook's system files (toolbar buttons, logo, variables, etc.), your ebook's project file and your actual ebook file. For example, if you called your ebook dog_grooming, here's what these folders and files will be called: dog_grooming.files (template, text, images, etc.) dog_grooming.system (toolbar buttons, logo, variables, etc.) dog_grooming.ebp (ebook settings) dog_grooming.exe (your ebook) The only file you need to include within your autorun file is your ebook file name. |
![]() Save the file as autorun.inf in the folder with your ebook.
Save the file as autorun.inf in the folder with your ebook.
![]() Open your CD burning software and place your ebook file (this is your EXE ebook file as indicated in red in the above explanation) and your new autorun file (this is the file you just created within the text editor) within the root directory of your CD and burn.
Open your CD burning software and place your ebook file (this is your EXE ebook file as indicated in red in the above explanation) and your new autorun file (this is the file you just created within the text editor) within the root directory of your CD and burn.
The autorun file is telling your computer to automatically open your ebook.
If this doesn't work for you, you may not be placing the files on the CD correctly, or there may be an issue with your autorun system on your computer. Please ensure your computer is able to open other CDs. If it's not and you're running Windows XP, you can download an autorun fix from SoftwarePatch.com.
![]() Editing Your eBook Style Sheets
Editing Your eBook Style Sheets
If you are a more advanced user, you can edit your ebook's style sheets.
Many of the eBook templates have default variables with pre-defined font styles. You may change the font styles simply by editing the page's style sheet. Go to C:\Program Files\eBook Starter\Templates\ to locate your template file. Open your selected template folder to locate each individual page folder -- each template page has it's own style sheet and must be edited separately.
Text / Variable HTML Heading Tags
| Text / Variable | Template Page | Heading Tag |
|---|---|---|
| %{EBOOK_TITLE} | Book Cover | <H1> |
| %{EBOOK_SUBTITLE} | Book Cover | <H2> |
| %{FULL_NAME} | Book Cover | <H3> |
| Copyright © %{COMPANY_NAME} %{CURRENT_YEAR} All Rights Reserved | All Pages | <H4> |
To edit the font styles, simply locate the Heading Tag of your choice within the style sheet.
![]() Table of Contents Macro
Table of Contents Macro
You can display your eBook's Table of Contents within any page you'd like. Simply place the following macro where you would like your Table of Contents to appear:
![]()
It will be replaced with your Table of Contents when you compile your eBook.
Adding the 'Contents' Image to Your Pages
If you would like to display your eBook's 'Contents' image within the additional pages, you can find the image within your template folder.
Simply click on the '![]() ' button on the editor toolbar to add an image to your page -- a files window will load. Click through the folders until you find your template folder. You'll find it here:
' button on the editor toolbar to add an image to your page -- a files window will load. Click through the folders until you find your template folder. You'll find it here:
C:\Program Files\eBook Starter\Templates\
Once you've located your template folder, open it and you will find some additional folders -- one for each page. Open the page_3-4.files folder to locate the contents.gif image.
![]() Re-registering eBook Starter
Re-registering eBook Starter
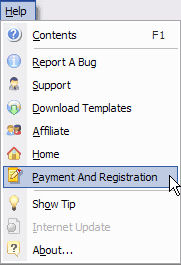
If you've previously registered a copy of eBook Starter, you can retrieve your Registration Key by going to 'Help' - 'Payment and Registration' on the eBook Starter toolbar and clicking on the 'Register Online' link. Your registration key will be displayed.
However, if you had to reformat your
Simply copy your key and paste it into the 'Key Info' section and click on 'Save.'
'Help' - 'Payment and Registration' Window
'Payment and Registration' Window
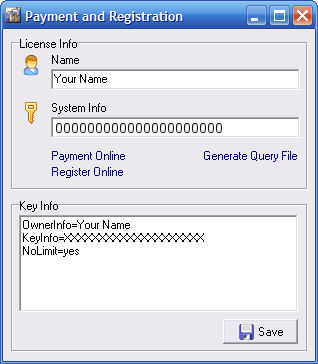
Please note: If you reformat your hard drive, or you purchase a new computer, you will need to contact support to obtain a new registration key.