Customizing Your eBook's Toolbar Buttons
 Customizing Your eBook's Toolbar Buttons
You can completely customize your eBook's toolbar. Once you've selected your eBook's button sizes and toolbar colors within the 'Options' section, you can visit the 'Toolbar' section to customize the buttons.
To select the buttons that should be displayed within your eBook, your first step will be to launch the 'Toolbar' window. On the eBook Starter toolbar, go to 'Project' - 'Toolbar' and click on the 'Buttons' tab to load the window.
All of the available buttons are displayed to enable you to select which buttons you would like to display within your eBook.. However, you certainly won't want to display all of them.
It is highly recommended that you only display one row of buttons, as any more will make your eBook appear to be too crowded and look unprofessional.
If you're using a template to create your eBook, here are the recommended buttons for your toolbar:
First
Prior
Next
Last
Home
Search
Bookmarks
Print
About
Exit
Your toolbar will look something like this:
![]()
Please note: The 'Created with: eBook Starter' logo is optional. However, if you leave it and include your affiliate ID within the 'Options' - 'Toolbar' - 'Link' section, you will earn a commission on any sales that are generated through your ebook.
![]() Toolbar Buttons
Toolbar Buttons
| Button | Caption | Action |
|---|---|---|
| Back | Go back to the previous page in your browser history | |
| Forward | Go forward to the next page in your browser history | |
| First | Go to the first page in your eBook's Story tree | |
| Prior | Go to the previous page in your eBook's Story tree | |
| Next | Go to the next page in your eBook's Story tree | |
| Last | Go to the last page in your eBook's Story tree | |
| Previous Chapter | Go to the previous chapter in your eBook's Story tree | |
| Next Chapter | Go to the next chapter in your eBook's Story tree | |
| Refresh | Reload the current page | |
| Home | Go to your eBook's starting page | |
| Font Size | Enlarge or reduce your eBook's text size | |
| Search eBook | Search your eBook | |
| BookMark | Display a drop down list of internal or external favorite links | |
| Print page button | ||
| Copy | Copy your eBook's text | |
| About | Display an information window about you and/or your company and web site | |
| Exit | Exit the eBook |
![]() Editing the Toolbar Buttons
Editing the Toolbar Buttons
You can edit all of the toolbar buttons by using the editing buttons at the top of the toolbar window. You can also right click on your mouse at any time to reach the editing options.
![]() Add Button
Add Button
If you would like to add or change your buttons, you may do so by clicking on the button to highlight and then on the '![]() ' button. You can also right click on your mouse to locate the '
' button. You can also right click on your mouse to locate the '![]() ' button. The 'Toolbar Button Properties' window will load.
' button. The 'Toolbar Button Properties' window will load.
'Toolbar Button Properties' Window
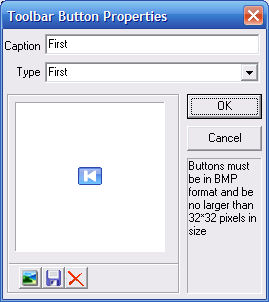
The 'Caption' area will enable you to specify what text should be displayed beneath the button. However, your text should be as short as possible to enable the button to display properly.
The 'Type' area will specify the function of the button.
To load your own icon, click on the '![]() ' icon at the bottom. Your icon must be in BMP format and be no larger than 32*32 pixels in size.
' icon at the bottom. Your icon must be in BMP format and be no larger than 32*32 pixels in size.
![]() Delete Button
Delete Button
If you would like to remove a button, simply click on the button to highlight, then on the '![]() ' button to remove it. You can also right click on your mouse to locate the '
' button to remove it. You can also right click on your mouse to locate the '![]() ' button.
' button.
![]() Edit Button
Edit Button
The '![]() ' button is very similar to the '
' button is very similar to the '![]() ' button. However, this option is used to edit individual buttons.
' button. However, this option is used to edit individual buttons.
To edit a button, double click on the button to open the 'Toolbar Button Properties' window. You can also open the 'Toolbar Button Properties' window by clicking on the button to highlight, and then on the '![]() ' button. You can also reach the '
' button. You can also reach the '![]() ' button option by clicking on the button to highlight and then right clicking on your mouse.
' button option by clicking on the button to highlight and then right clicking on your mouse.
![]() Move Up
Move Up
The '![]() ' button will enable you to move your toolbar buttons up.
' button will enable you to move your toolbar buttons up.
Click on the toolbar button you'd like to move to highlight, then on the '![]() ' button. The toolbar button will move up one position each time you click the '
' button. The toolbar button will move up one position each time you click the '![]() ' button.
' button.
![]() Move Down
Move Down
The '![]() ' button will enable you to move your toolbar buttons down.
' button will enable you to move your toolbar buttons down.
Click on the toolbar button you'd like to move to highlight, then on the '![]() ' button. The toolbar button will move down one position each time you click the '
' button. The toolbar button will move down one position each time you click the '![]() ' button.
' button.
![]() Preview Toolbar
Preview Toolbar
Once you've selected the buttons for your toolbar, click on the '![]() ' button to see how your eBook's toolbar will look.
' button to see how your eBook's toolbar will look.
![]() Reset
Reset
The '![]() ' button will enable you to reset all the toolbar icons to the default setting.
' button will enable you to reset all the toolbar icons to the default setting.
Click on the '![]() ' button, or right click on your mouse to reach the '
' button, or right click on your mouse to reach the '![]() ' button.
' button.