Creating Your Own Templates
 Creating Your Own Templates
You can create your own HTML templates and use them within the eBook Starter program.
![]() Creating a Template Folder
Creating a Template Folder
![]() Your first step will be to create a
Your first step will be to create a ![]() template
template ![]() folder for your new
folder for your new ![]() template. Although you can name the
template. Although you can name the ![]() folder whatever you'd like, your template name must be followed by .files.
folder whatever you'd like, your template name must be followed by .files.
Your ![]() template
template ![]() folder should look something like this:
folder should look something like this:
![]()
The 'template' text in the example above may be replaced by the text of your choice.
Your new folder should be placed with the rest of the eBook Starter templates here:
C:\Program Files\eBook Starter\Templates
![]() Creating Your Page Folders
Creating Your Page Folders
![]() Your next step will be to create a
Your next step will be to create a ![]() folder within your template.files
folder within your template.files ![]() folder for each
folder for each ![]() page your template will contain. Each
page your template will contain. Each ![]() page must have its own
page must have its own ![]() folder that contains all the files for that particular
folder that contains all the files for that particular ![]() page, including images and CSS files.
page, including images and CSS files.
Although you can name the ![]() folders whatever you'd like, your
folders whatever you'd like, your ![]() folder name must be followed by .files. In addition, your
folder name must be followed by .files. In addition, your ![]() folder name must have the same name as your
folder name must have the same name as your ![]() page name.
page name.
For example, if your file is called index.htm, your ![]() folder should be called, index.files.
folder should be called, index.files.
Your template ![]() folders might look something like this:
folders might look something like this:

![]() Template Image
Template Image
In addition to your template.files ![]() folder containing
folder containing ![]() pages and page folders, you will also need a screen shot
pages and page folders, you will also need a screen shot ![]() image of your template. This
image of your template. This ![]() image must be 200*200 pixels in size and must be in BMP format. It will be displayed within the template wizard.
image must be 200*200 pixels in size and must be in BMP format. It will be displayed within the template wizard.
![]() Description Text File
Description Text File
And finally, you will need to create a text file called, ![]() description. The
description. The ![]() description file contains a simple sentence describing the template. This
description file contains a simple sentence describing the template. This ![]() description will be displayed within the little window beneath the template screen shot within the eBook Starter program.
description will be displayed within the little window beneath the template screen shot within the eBook Starter program.
![]() Creating an EBT File
Creating an EBT File
![]() Your next step will be to create a file with the same name as your template
Your next step will be to create a file with the same name as your template ![]() folder, except with an EBT extension. In this example, the
folder, except with an EBT extension. In this example, the ![]() file will be called: template.ebt
file will be called: template.ebt
This ![]() file may be created within a text editor and should be placed in the same directory as your template.files folder. However, make certain you don't place the file within the template.files
file may be created within a text editor and should be placed in the same directory as your template.files folder. However, make certain you don't place the file within the template.files ![]() folder, as your
folder, as your ![]() template will not function properly.
template will not function properly.
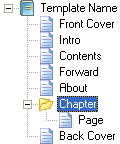
Your file should look something like this:
![]()
XML Coding
The EBT ![]() file should be written in XML and be formatted something like this:
file should be written in XML and be formatted something like this:
| <Template Caption="Template Name" Description="Description.txt" Thumbnail="template.bmp" DefaultPage="page.htm"> <Page Caption="Front Cover" path="book_cover.htm"/> <Page Caption="Intro" path="intro.htm"/> <Page Caption="Contents" path="contents.htm"/> <Page Caption="Foreword" path="foreword.htm"/> <Page Caption="About" path="about.htm"/> <Chapter Repeatable=True RepeatQuestion="Number of Chapters"> <Page Caption="Page" path="page.htm" Repeatable=True RepeatQuestion="Number of Pages"/> </Chapter> <Page Caption="Back Cover" path="back_cover.htm"/> </Template> |
The above XML coding will specify exactly how your template should be displayed. In this example, the ![]() template will look like this within the 'Files Window' of eBook Starter:
template will look like this within the 'Files Window' of eBook Starter:
Your template can be displayed however you'd like as long as you follow the basic formatting guidelines.
XML Template Chart
| Tag | Attributes | Value | Description |
|---|---|---|---|
| <Template></Template> | Caption Description Thumbnail |
Template Name description.txt template.bmp |
Name of the template Description filename Template screen shot filename |
| <Page /> | Caption Path Repeatable RepeatQuestion |
Front Cover, etc. book_cover.htm, etc. True Number of Pages |
Name of the page HTML file name User may add multiple pages Question to be asked within eBook Starter |
| <Chapter></Chapter> | Repeatable RepeatQuestion |
True Number of Chapters |
User may add multiple chapters Question to be asked within eBook Starter |
Files Window
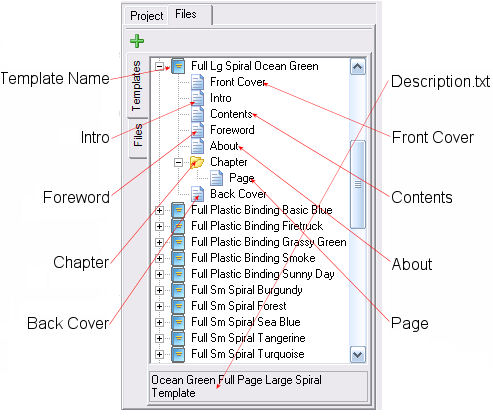
The above example is just that -- an example. You can format your ![]() templates however you'd like. For additional examples, you can look at the current eBook Starter templates here:
templates however you'd like. For additional examples, you can look at the current eBook Starter templates here:
C:\Program Files\eBook Starter\Templates
![]() Designing Your Template Pages
Designing Your Template Pages
Although you can design your ![]() pages however you'd like, you must include a special META tag between your HEAD tags and create specific 'Content' areas so that your
pages however you'd like, you must include a special META tag between your HEAD tags and create specific 'Content' areas so that your ![]() pages can be edited within the eBook Starter editor.
pages can be edited within the eBook Starter editor.
Your META tag should look like this:
| <HTML> <HEAD> <META http-equiv=Content-Type content="text/html; charset=%{CHARSET}"> <TITLE>Your Page Title</TITLE> </HEAD> <BODY> </BODY> </HTML> |
Your content areas should look something like this:
| <DIV ID="singlepage" STYLE="width:100%;height:550px;overflow:auto"> <PAGE NAME="Chapter Page"> <H2>Page Heading</H2> (This area will be edited within the editor) <P> Place your page content here. (This area will be edited within the editor) </PAGE> </DIV> |
HTML Template Chart
| Tag | Attributes | Value | Description |
|---|---|---|---|
| <DIV></DIV> | ID STYLE |
singlepage, leftpage, rightpage width:100%, height:450px, overflow:auto |
Your 'Content' areas must be enclosed with the DIV tags to enable your content to display properly within your eBook. The ID="singlepage" specifies that this particular content area is one single page. If your template is in an open book format, you will need to create two separate content areas. The DIV ID for the left content might be "leftpage" and the DIV ID for the right might be "rightpage." To enable the content to print properly, the DIV ID must end with the word 'page.' For example, you could use singlepage, Single_Page, leftpage, Left_Page, rightpage, Right_Page, toppage, Top_Page, bottompage, Bottom_Page, etc.. The names you select will be displayed within your eBook when the 'Print' button is clicked on. A drop-down list will appear and enable your reader to select the content they'd like to print. If you don't want your readers to print your content, simply don't include the 'Print' button within your eBook. However, it is highly recommended that you do, as many people like to print out the content and read it offline. Although you can set your DIV height to whatever you'd like, the DIV width must be set to 100%. The overflow specifies that if your content takes up more space than your content area, scroll bars will automatically appear. |
| <PAGE></PAGE> | Name | Chapter Page | Your 'Content' areas must be enclosed with the <PAGE></PAGE> tags, which will be placed inside the <DIV> tags, so that the content may be edited within the eBook Starter editor. All of the 'Content' that appears between the <PAGE> and </PAGE> tags may be edited within the editor. To specify the type of content that should be placed within a specific content area, place a sentence, such as 'Place your Introduction text here' or 'Place your Foreword text here.' This default text will instantly tell you what content should be placed within a specific page. The 'Name' value will be displayed within the editor to define a specific content area. For example, if your template contains side by side content areas, such as an open book, your left content area might have a name value of 'Left Page' and your right content area might be called 'Right Page.' |
![]() Displaying Images within Your Template
Displaying Images within Your Template
If your ![]() template will be displaying any images, the image code within your HTML must look something like this:
template will be displaying any images, the image code within your HTML must look something like this:
The ![]() code is a macro and will be automatically replaced by the template's folder name. The image text indicated in red should be changed to the name of your image.
code is a macro and will be automatically replaced by the template's folder name. The image text indicated in red should be changed to the name of your image.
![]() Displaying a Table of Contents
Displaying a Table of Contents
If your template will be displaying a Table of Contents, place the following code within the HTML of your TOC page like this:
The ![]() code is a macro and will be automatically replaced by the titles of your pages that link to each corresponding page.
code is a macro and will be automatically replaced by the titles of your pages that link to each corresponding page.
![]() Opening External Links within Your eBook in a New Window
Opening External Links within Your eBook in a New Window
If you would like the external links within your eBook to open in a new window, you will need to include the following JavaScript (indicated in bold) between the <HEAD> and </HEAD> tags of your HTML document:
| <HTML> <HEAD> <META http-equiv=Content-Type content="text/html; charset=%{CHARSET}"> <SCRIPT language=Javascript> function externalLinks() { if (!document.getElementsByTagName) return; var anchors = document.getElementsByTagName("a"); for (var i=anchors.length-1; i>=0; i--) { var anchor = anchors[i]; if (anchor.href && anchor.href.substr(0,7) == "http://") anchor.target = "_blank"; } } window.onload = externalLinks; </SCRIPT> <TITLE>Your Page Title</TITLE> </HEAD> <BODY> </BODY> </HTML> |
This script will enable your external links to open within a new window and not within your ebook.